I'm making pumpkin creme brulees for Thanksgiving dessert and wanted to see if anyone has a good recipe! I've looked online and have found some with varying ingredients but since I've never made them before I'm not sure which one to use!
I've been meaning to post an adorable cake I made for a one year old's birthday. Hopefully I'll have time to post it next week!
Friday, November 19, 2010
Saturday, November 6, 2010
Pumpkin Whoopie Pies
Yes, it has been over a month since I blogged last. I will spare you the boring details about how busy my life has been and just get to the recipe! Pumpkin whoopies pies, courtesy of Martha Stewart, are perfect for fall. I'm one of those people that loves Fall, not only because it's my birth season (see my birthday cake below), but because everything pumpkin flavored comes back!

Ingredients
3 cups flour
1 teaspoon salt
1 teaspoon baking powder
1 teaspoon baking soda
3 tablespoons ground cinnamon
1 tablespoon ground ginger
1 tablespoon ground cloves
2 cups firmly packed dark brown sugar
1 cup vegetable oil
1 can pumpkin filling, chilled
2 eggs
1 teaspoon vanilla extract
Filling ingredients
3 cups confectioners' sugar
1 stick unsalted butter, softened
8 oz. cream cheese, softened
1 teaspoon vanilla extract
Directions
Preheat oven to 350 degrees. In a large bowl, whisk flour, salt, baking powder, baking soda, cinnamon, ginger, and cloves. Set aside. In a stand mixer, mix brown sugar and oil until well combined. Add pumpkin filling and mix well. Add eggs and vanilla until well combined. Sprinkle flour mixture over pumpkin mixture until fully incorporated. Drop heaping tablespoons of dough on a parchment-lined baking sheet about 1 inch apart. Bake until cookies are just starting to crack on the top - about 15 minutes.
Icing - sift confectioners' sugar in a large bowl. In a stand mixer with a paddle attachment beat the butter until smooth. Add the cream cheese until well combined. Add sugar and vanilla and beat just until smooth. Transfer filling to a disposable pastry bag and spread a healthy portion on the bottom side of one cookie and place the second cookie on top. Refrigerate for 30 minutes.
And as promised, here is my birthday cake from my 25th birthday! I think Ben did a great job telling Miss Muff'n what I wanted!

Friday, October 1, 2010
Furniture Makeover
I recently re-did a small China cabinet Ben's mom gave me. And when I say "re-did" I don't mean that I did anything that a normal person couldn't do. Just sanded, primed, and painted!
Supplies:
Small can of gray primer (I used Glidden brand)
pack of 150 grit sandpaper
1/2" and 2" paint brushes
pack of small paint brushes (for the detail on the front)
painters tape
small can of paint (I used Martha Stewart "Maine Lobster" in eggshell paint finish)
scrap newspaper
 The cabinet had a medium brown stain when I got it, and while researching I found lots of people who said that you have to completely remove the stain before you can paint. WRONG. That would have taken me YEARS to finish. Luckily, Stacy (of The Little Chick fame) gave me some very helpful and time-saving pointers before I started on this little project!
 I started out by sanding everything with 150 grit sandpaper. I can't take all of the credit for the sanding, Ben was definitely helpful, because let's be honest, sanding is no fun. FYI - I would remove any doors or anything like that and sand those separately.
 After we finished sanding, we wiped down everything with a damp cloth and let it dry for a couple of minutes. As you can see, I had to carefully place strips of newspaper behind the wood on the front so I could paint it. While this did not 100% keep paint off the glass it was definitely helpful. Hint - about 5 minutes after you paint the primer remove the newspaper, otherwise the paint will make it stick to the wood (I learned this the hard way) and use new newspaper strips when painting the top coat.
 While priming the cabinet I decided to leave the back and bottom brown, but after painting the first coat of red paint I went back and painted the bottom red because something just didn't look right.
 Then the red painting started. I did two coats, which was the perfect amount. At first I was nervous about this color, because it's red and red can easily go horribly wrong, but after it was all said and done I loved it!
 Hint - do not go by what colors look like on the internet. They are wrong wrong wrong. Go look up Maine Lobster. It looks nothing like this.

This project was so much fun and really didn't take very long (and you don't have to be a furniture expert to do it)! I probably could have finished in one weekend if I had devoted most of my time to it. If any of my instructions weren't clear or if you have any questions just e-mail me - jstansbakery [at] gmail [dot] com
Supplies:
Small can of gray primer (I used Glidden brand)
pack of 150 grit sandpaper
1/2" and 2" paint brushes
pack of small paint brushes (for the detail on the front)
painters tape
small can of paint (I used Martha Stewart "Maine Lobster" in eggshell paint finish)
scrap newspaper


The flash makes the glass look weird - sorry
This project was so much fun and really didn't take very long (and you don't have to be a furniture expert to do it)! I probably could have finished in one weekend if I had devoted most of my time to it. If any of my instructions weren't clear or if you have any questions just e-mail me - jstansbakery [at] gmail [dot] com
Tuesday, September 21, 2010
Party Food - Hummus
I have not always been a big fan of hummus. I know I've said this before, but I am picky, and hummus was one of those things I was not going to try. I repeat: NOT. GOING.TO.TRY. That all changed when Ben started making homemade hummus. It wasn't like I all of a sudden became obsessed with it, but I gradually started to warm up to it. And here I am making my own.
 Ingredients
1 can chickpeas, reserve liquid
juice from 1/2 lemon
1/3 cup olive oil
4 cloves of garlic
1 1/2 tablespoons of tahini
salt
Drain chickpeas and set aside liquid. In a food processor, add the garlic and pulse a couple of times until it is minced. Add chickpeas and most of the liquid, also add tahini, salt, lemon juice, and 1/3 cup olive oil. Process until smooth. Serve with warm pita bread.
Bruschetta is next!
And a big WOO PIG SOOIE to my Razorbacks who are ranked #10!!!

Fall 2006
Tuesday, September 14, 2010
Party Food - Taco Dip
Recently I hosted a little get-together at my house for the Kappa Delta Alum group I'm in. We had an international theme (I used a rough interpretation of international) which was more difficult to plan out than I had anticipated. Luckily, my bff and hostess extraordinaire, Elizabeth (we call her Ecampbell), had some great food ideas! I'm just going to highlight one of them tonight, but rest assured, you will get every recipe that I used, including an AMAZING dessert (not to brag or anything).
I'll start with our neighbor to the south, Mexico. Ecampbell gave me a delicious taco dip recipe. It has layers like a seven layer dip, but better, because it's served hot!

Taco Dip
1 lb ground beef
1 package taco seasoning
1 can refried beans
1 small can black olives
1 small can green chiles
1 jar taco sauce
shredded Monterey Jack cheese
Brown the meat in a skillet and add taco seasoning as if you are making tacos. Drain the excess liquid. In a dish, layer refried beans, chiles, taco meat, taco sauce, and olives (in that order). Cover with shredded cheese and bake at 350 for 20 minutes. Serve hot with tortilla chips or fritos.
The great thing about this dip is that it can be made ahead of time and just pop it in the oven before serving.
Next up, hummus!
Wednesday, September 1, 2010
Chocolate Peanut Butter Squares
Over the weekend my sister and I were trying to decide what to cook for dinner so naturally we started at the end of the meal with dessert. She whipped out her iTouch and used the Big Oven app to look up a chocolate dessert and this is what she found:

Chocolate Peanut Butter Squares
Ingredients
2 sticks butter, divided (Paula Deen would be proud)
2 cups creamy peanut butter
3 cups powdered sugar
1 1/2 cups graham cracker crumbs
2 cups semi-sweet chocolate chips (we splurged and got Ghirardelli)
In a large sauce pan, melt 1 stick of butter. Add the peanut butter, powdered sugar, and graham cracker crumbs. Stir. This will form a dough. Spoon this into a greased 9" x 13" dish and press down evenly. In a medium sauce pan, melt the remaining 1 stick of butter. Add the 2 cups of semi-sweet chocolate and stir until completely melted and smooth. Pour over the graham cracker crust and spread using a spatula. Place in the refrigerator for 30 minutes. Slice into squares before serving.
These are seriously addicting. I had to cut them into small squares so they would last longer! Enjoy!
P.S. I am so excited about the first Razorback game of the season! Woo pig sooie!

Wednesday, August 25, 2010
Egg and Cheese English Muffin
The Pioneer Woman has done it again. She always makes the most delicious food, so I was very excited when Ben wanted to try this recipe.

Ingredients
English Muffins
4-5 hard boiled eggs
shredded cheddar ("how much?" you ask. that depends on how much you love cheese, so for me it was a lot)
8 slices fried bacon
1 cup. mayonnaise
1 tablespoon Dijon mustard
2 teaspoons garlic powder
Worcestershire sauce
Chop the hard boiled eggs. Chop the fried bacon. Put the eggs and shredded cheddar in a bowl. Add the bacon and a cup of mayonnaise and stir. Add a tablespoon of Dijon mustard and 2 teaspoons of garlic powder. Add two-three dashes of Worcestershire sauce. Stir everything together slowly. Spread on the top of half of an English Muffin. Put them on a cookie sheet and broil for three-four minutes with the rack in the middle of the oven.
yum! And the best thing about these is that you can make them the night before and pop them in the oven the next morning!
Monday, August 23, 2010
Dinner on a Stick
Hello! I am embarrassed to say that I have been back from my beach vacation for a week and am just now getting around to blogging! So sorry to abandon you like that. But to make up for it I have some great recipes!
While at the beach, each couple took turns cooking dinner. As you may know, Ben and I like to make everything more complicated, so we had a themed meal - Dinner on a Stick. Sounds fancy, I know. We served everything from appetizers to dessert on sticks - four courses in all. So I'll start with the appetizer and work my way through the meal. Enjoy!
Antipasto on a Stick
Ingredients
1 package sliced salami
1 can large black olives
Italian dressing
1 package cheese stuffed tortellinis
toothpicks
Cook tortellinis as directed. Transfer to a bowl with ice water to stop cooking. Pat dry and put in a medium bowl with salami and olives. Pour 1/3 cup Italian dressing over the ingredients, stir. Begin assembling Antipastos on the toothpicks.

Ingredients
1 head of iceberg lettuce
carrots, sliced
cherry tomoatoes
cucumber, sliced
salad dressing of your choice
Skewers
Cut iceberg lettuce into chunks. Assemble carrots, cucumbers, lettuce, and tomatoes on skewers. Drizzle dressing before serving.


BBQ Chicken on a Stick
Ingredients
package of boneless skinless chicken breasts
Kosher salt
pepper
Garlic salt
BBQ sauce of your choice
Skewers
Cut the chicken breasts into chunks. Season with salt, pepper, and garlic salt. Assemble on the skewers. Grill it over charcoal for 15 minutes. Towards the end, brush BBQ sauce over the chicken.

Zucchini on a Stick
4 zucchini, sliced
olive oil
kosher salt
pepper
Skewers
Slice the zucchini. Assemble on skewers. Drizzle olive oil, salt, and pepper. Grill for 5 minutes.

Popsicles
Peaches and cream
2 cups non-fat vanilla yogurt
1 cup mashed peaches
1/2 cup skim milk
sprinkle of sugar
wooden stir sticks (found in Wal-Mart's craft section)
Blend all ingredients together until smooth. Pour into ice trays. Freeze for 3 hours and then place wooden sticks in each tray.

Strawberry Orange Popsicle
1 pound fresh strawberries, sliced
1 cup orange juice
sprinkle of sugar
wooden stir sticks
Blend all ingredients together until smooth. Pour into ice trays. Freeze for 3 hours and then place wooden sticks in each tray.


This meal was a lot of fun and the Popsicle got great reviews, so I will definitely be making those again!
Friday, July 30, 2010
Grilled Peach and Mozzarella Salad
This recipe is brought to you by the Fine Cooking magazine. Ben found the recipe while browsing through the magazine and knowing that I love peaches and basically any kind of cheese he decided we needed to try it out.
We couldn't immediately find any Buffalo mozzarella, so we just grabbed a ball of the regular kind and I don't think it made a difference, or if it did I didn't notice. I also suggest making this salad when you already have food to prepare on the grill, so you aren't lighting the grill just for the peaches.
 Ingredients
3/4 cup balsamic vinegar
2 sprigs fresh thyme
Kosher salt and ground pepper
2 ripe peaches, halved and sliced
4 1/2 teaspoon EVOO
4 cups baby arugula
1 ball mozzarella cheese, cut into 3/4" chunks
Prepare a charcoal fire grill. Combine the vinegar and thyme in a 2 quart saucepan and bring it to a boil over medium heat. Reduce to a simmer and cook until the mixture is thick, syrupy, and reduced to 1/4 cup, about 6-9 minutes. Remove from the heat, discard the thyme sprigs, and season with a pinch of salt and a few grinds of pepper. Rub the peaches all over with 2 teaspoons of the oil and season lightly with salt and pepper. Grill cut side down until lightly charred, 3-4 minutes. Transfer to a cutting board and let cool slightly. Slice each piece into thirds. In a medium bowl, toss the arugula with the remaining 2 1/2 teaspoon of oil and season with salt and pepper. Arrange on a platter. Top with the mozzarella and peaches. Drizzle with about 2 teaspoons of the reduced balsamic vinegar.
 Delish!
We couldn't immediately find any Buffalo mozzarella, so we just grabbed a ball of the regular kind and I don't think it made a difference, or if it did I didn't notice. I also suggest making this salad when you already have food to prepare on the grill, so you aren't lighting the grill just for the peaches.

3/4 cup balsamic vinegar
2 sprigs fresh thyme
Kosher salt and ground pepper
2 ripe peaches, halved and sliced
4 1/2 teaspoon EVOO
4 cups baby arugula
1 ball mozzarella cheese, cut into 3/4" chunks
Prepare a charcoal fire grill. Combine the vinegar and thyme in a 2 quart saucepan and bring it to a boil over medium heat. Reduce to a simmer and cook until the mixture is thick, syrupy, and reduced to 1/4 cup, about 6-9 minutes. Remove from the heat, discard the thyme sprigs, and season with a pinch of salt and a few grinds of pepper. Rub the peaches all over with 2 teaspoons of the oil and season lightly with salt and pepper. Grill cut side down until lightly charred, 3-4 minutes. Transfer to a cutting board and let cool slightly. Slice each piece into thirds. In a medium bowl, toss the arugula with the remaining 2 1/2 teaspoon of oil and season with salt and pepper. Arrange on a platter. Top with the mozzarella and peaches. Drizzle with about 2 teaspoons of the reduced balsamic vinegar.

Thursday, July 29, 2010
Chocolate Covered Bacon
At first I was skeptical about this food venture, but since I love the combination of sweet and salty foods I thought why not give it a shot? Our friend Rob's birthday presented the perfect opportunity to try this recipe. He will be the first to tell you that he loves bacon (and whiskey), but since I don't have a recipe that calls for whiskey I had to go with the bacon.
 Ingredients
package of Petit Jean thick cut bacon
24 ounces of semisweet chocolate morsels
Preheat oven to 375. Line two baking sheets with parchment paper. Place bacon on the baking sheets (you'll probably be able to fit 6-7 on each one). Bake bacon for 18 minutes for soft bacon or 20 minutes for crispy bacon. About half way through flip each slice of bacon so it will evenly cook on both sides. Take the bacon out of the oven and let it cool for 5 minutes. Transfer it to a papertowel lined plate. Set up a double boiler and heat the water to a boil and reduce to a simmer. Pour half of the chocolate morsels in the double boiler and stir with a fork until melted and smooth. Slowly add the remaining morsels. Lay 2 sheets of parchment paper on the counter. Dip the bacon slices in the bowl of chocolate, rotating to coat both sides. Place on the parchment paper to cool, then transfer to the refrigerator to harden.

The chocolate covered bacon was great! We even had a piece for breakfast one morning! (what? it is bacon!)
Thursday, July 22, 2010
Fried Squash
I am loving all of the fresh veggies people give us from their gardens. This year we only planted tomatoes (bleh) so I'm having to rely on the generosity of other to get my summer veggie fill! Apparently fried squash is not a new dish, but it was new to Ben and me. Yes, we've made fried okra, but squash? Who knew?

Ingredients
5-7 medium sized squash
1 1/4 cup yellow corn meal
1/2 cup Italian bread crumbs
1 tablespoon garlic powder
salt and pepper
1 cup flour
1 cup buttermilk
vegetable oil
Parmesan cheese for garnish
Mix all of the dry ingredients together in a large bowl, minus the Parmesan. Pour butter milk in a medium bowl. Wash and slice squash and place in the bowl with the buttermilk. Make sure to coat the squash really well with the buttermilk. Transfer squash to the dry mixture and make sure to coat well (you will have to do this in shifts). Place a large skillet on medium high heat. After about 1 minute carefully pour the vegetable oil so it covers the bottom of the skillet. Place about 6-8 squash rounds in the skillet and let them cook until golden brown, then flip to the other side. Transfer to a paper towel and sprinkle Parmesan cheese, if desired.
Are there any other fried vegetables out there that I need to try (NOT tomatoes, though)?
Wednesday, July 21, 2010
Dark Chocolate Creme Brulee
This weekend I made dark chocolate creme brulee, because I was trying to be healthy by using dark chocolate, duh. And after making creme brulee three separate times, I think I've finally realized Ben's favorite part - the torch. Do you know any guys who don't love fire? Oh, you do? Well that's unfortunate, because the torch is pretty fun.

2 cups whipping cream
2 cups half and half
8 egg yolks
10 oz dark chocolate morsels
1/3 cup sugar, plus extra for the torch
Preheat oven to 300. Pour whipping cream and half and half into a large saucepan over medium-high heat and bring to a boil. Reduce heat to low. Add chocolate and whisk until melted and smooth. Whisk egg yolks and sugar in a separate bowl. Gradually whisk in chocolate mixture. Divide mixture among 10-12 ramekins. Place in a baking pan (you will need at least two) and add enough hot water to come half way up the sides of the cups. Bake until the custard is set, about 50 minutes. Chill for 2 hours (or more). Right before serving sprinkle sugar on top of each ramekin and using a creme brulee torch, lightly brown the sugar.
Here's a YouTube video that shows how to use the torch if you've never done it before!
Wednesday, July 14, 2010
The Little Chick Boutique
I wanted to share the cutest online baby boutique with y'all - The Little Chick. All of the items are handmade right here in Little Rock. Stacy (Ben's aunt and the owner of The Little Chick) specializes in baby and toddler items, but no project is too big for her to handle, so if you have a special request send it her way!
 I saw one of the baby blankets last week and it was so cute! The fabrics are so soft and colorful. Stacy really does a great job at matching fabrics to create unique bibs and blankets.
 And even though Stacy has an adorable little girl, she makes sure not to leave out the baby boys!

 If you have a baby shower coming up make sure you take a look at Stacy's store!


Tuesday, July 13, 2010
Check out my guest post!
If you have a minute go check out my guest post on Arkansas Women Bloggers today. I made a special Southern summer meal complete with fried okra and caprese salad!


Monday, July 12, 2010
Homemade Lemonade
I know most people know how to make homemade lemonade, but rarely take the time to do so. Don't get me wrong, I'm guilty of that, too. It's so easy to grab a pack of lemonade mix, add water and be done. But nothing can replace the taste of homemade lemonade, especially on a hot summer day.
 Happy Monday!

Wednesday, July 7, 2010
Key Lime Pie
While we were out of town for the 4th of July this past weekend I made a key lime pie. Well, actually it was just a lime pie because Kroger didn't have any key limes, or I couldn't find them. The recipe is featured in this month's Southern Living and is supposed to be healthier than most because you use fat free ingredients. I don't mind using fat free ingredients, just as long as it doesn't take away from the taste, which I don't think this did!

1 (14 oz.) can of fat free sweetened condensed milk
3/4 cup egg substitute
3/4 cup lime juice
2 teaspoons grated lime rind
1 graham cracker crust (reduced fat or not)
8 oz. fat free whipped cream, thawed
Pre heat oven to 350. Mix condensed milk, egg, lime juice and grated lime with a mixer. Pour into the crust. Bake 10-12 minutes. Place on a cooling rack for 1 hour. Top with whipped cream and chill in refrigerator until time to serve. Garnish with lime wedges or curls.
Sorry the picture is terrible quality - my camera was not wanting to focus that evening.

Rest assured that the swan in the background is not mine.
Ingredients1 (14 oz.) can of fat free sweetened condensed milk
3/4 cup egg substitute
3/4 cup lime juice
2 teaspoons grated lime rind
1 graham cracker crust (reduced fat or not)
8 oz. fat free whipped cream, thawed
Pre heat oven to 350. Mix condensed milk, egg, lime juice and grated lime with a mixer. Pour into the crust. Bake 10-12 minutes. Place on a cooling rack for 1 hour. Top with whipped cream and chill in refrigerator until time to serve. Garnish with lime wedges or curls.
Sorry the picture is terrible quality - my camera was not wanting to focus that evening.
Tuesday, June 29, 2010
Mint Chocolate Chip Ice Cream
Summer is the perfect time to make homemade ice cream and who says you have to stop at vanilla?
 The recipe is simple, but patience is needed because once you make the mix you still have a long way to go before you can actually eat the ice cream.
Ingredients
3 cups half and half
1 cup heavy cream
8 large egg yolks
9 ounces sugar
2 1/2 teaspoons peppermint extract
green food coloring
1 cup mini chocolate morsels
Place half and half and heavy cream in a medium sauce pan over medium heat. Bring to a simmer and remove from heat. Whisk the egg yolks until they lighten in color. Gradually add sugar and whisk to combine. Gradually add the cream mixture to the eggs until 1/3 has been added. Pour in the rest and return the mixture to the saucepan and place over low heat. Continue to cook, stirring constantly, until the mixture coats the spoon. Pour mixture into a container and allow to sit for 30 minutes. Add food coloring until you reach your desired color. Add peppermint extract. Place in the refrigerator for 2 hours or more (the longer you leave it in the refrigerator the faster it will freeze in the ice cream machine). Pour into the ice cream machine and follow manufacturer’s instructions. Add the mini chocolate chips towards the end of the mixing time.
Next I plan to tackle strawberry or chocolate ice cream! Sorry, Ben, no plain vanilla for you!
Monday, June 28, 2010
Cheeseburgers
Everyone should know how to prepare and grill cheeseburgers. It's the American way! If you're one of the many people whose cheeseburgers always shrink to half of their size or if you can't seem to find the right seasonings, maybe this post can help you.

The key to making cheeseburgers the correct size is to pat them out as much as possible before grilling. This doesn't mean that you need to make your hamburger patty resemble a pancake. It just means that since the burger shrinks when it's on the grill you have make it a little bigger than you usually would.
 As far as seasonings go, I use the following:
Worchestershire sauce
salt
pepper
Italian seasoning
Once you have the hamburger patties made sprinkle the seasonings on both sides. I usually do a couple of shakes of each (I know, I'm so precise). I used less than half of the Italian seasoning for 5 cheeseburgers, so be careful with that stuff because a little goes a long way. Grill for 4-5 minutes on each side and you're done!

The key to making cheeseburgers the correct size is to pat them out as much as possible before grilling. This doesn't mean that you need to make your hamburger patty resemble a pancake. It just means that since the burger shrinks when it's on the grill you have make it a little bigger than you usually would.

Worchestershire sauce
salt
pepper
Italian seasoning
Once you have the hamburger patties made sprinkle the seasonings on both sides. I usually do a couple of shakes of each (I know, I'm so precise). I used less than half of the Italian seasoning for 5 cheeseburgers, so be careful with that stuff because a little goes a long way. Grill for 4-5 minutes on each side and you're done!
Wednesday, June 16, 2010
Candy Sushi
Last weekend my sister and I made candy sushi (with the help of Ben, of course). I think this dessert was more fun to make than actually eat. Don't get me wrong, I love sugar, but this has a lot of candy! Check out her blog for step-by-step instructions (if it's not up yet check back in a few days!).
 We used gummy worms, fruit by the foot, gummy bears, and Swedish fish for the filling. And homemade rice krispy treats served as the rice and fruit roll-ups served as the seaweed.
 Don't you think this dessert would be fun to have for a kid's party or some sort of themed party? I do!


Friday, June 11, 2010
Duck and Mushroom Soup
I know what y'all are thinking, "Duck soup? In June? Have you lost your mind?". And my answer to that is no I have not, however, Ben HAS! Last Sunday Ben decided, months and months after hunting season, that he needed to use those ducks for something. And what does he decide to make on a day where the temp is 95 degrees and climbing? SOUP! So while I'm posting about making soup in mid-June, just file this recipe away until a cold winter weekend in December.
The soup was delicious and I can't wait to have some this winter!
The dish is one of Arkansas' own - of which I am very proud! Watch the video below for complete instructions and ingredients.
The soup was delicious and I can't wait to have some this winter!
Thursday, June 3, 2010
Sunflower Cupcakes
As I mentioned last week, we went to Memphis to celebrate Memorial Day. It was so much fun! One of my bffs, Courtney, flew in from Florida with her boyfriend. It was like a mini-reunion (reunited and it feels so good!). Anyways, Katie (creator of the adorable halloween cupcakes and my 24th birthday cake) made the cutest sunflower cupcakes! She used Wilton's small leaf tip (#67) to create the sunflower petals.
Tip: We noticed that the tip really wasn't wide enough to let the icing through, so Katie had to pry it open just a little.

Katie used Martha Stewart's One Bowl Chocolate Cake recipe for the cupcakes, and her grandmother's buttercream icing recipe! Yum Yum!
 After letting the cupcakes cool, ice a small circle in the middle of the cupcake (see above picture)

Dip the cupcake in chocolate sprinkles.
 Start icing small petals around the rim, then ice another ring of petals moving inward. (make sense?)

*Sorry the pictures are not great. My camera was acting funny.
Tip: We noticed that the tip really wasn't wide enough to let the icing through, so Katie had to pry it open just a little.

Katie used Martha Stewart's One Bowl Chocolate Cake recipe for the cupcakes, and her grandmother's buttercream icing recipe! Yum Yum!


Dip the cupcake in chocolate sprinkles.


*Sorry the pictures are not great. My camera was acting funny.
Wednesday, May 26, 2010
Sausage, Cheese, and Salsa Crostinis
I made these appetizers a while back and forgot to post them! oops! These are perfect for a Fiesta-themed meal and easy to prepare!

Ingredients
1 package of sausage
1 jar of chunky salsa (mild, medium, hot - doesn't matter)
baguette slices (I bought the pre-cut ones)
1/2 cup sour cream
1/3 cup Monterey Jack cheese
1/2 cup fresh cilantro, minced
Cook the sausage in a skillet. Drain excess liquid. Toast the baguette slices. Place a spoonful of salsa on the bread and layer sausage, cheese on top. Toast in the oven for about 5 minutes. Add a small dollop of sour cream and cilantro.
I hope everyone has a great Memorial weekend. We're traveling to Memphis on Friday and will be having a crawfish boil this weekend!
Wednesday, May 19, 2010
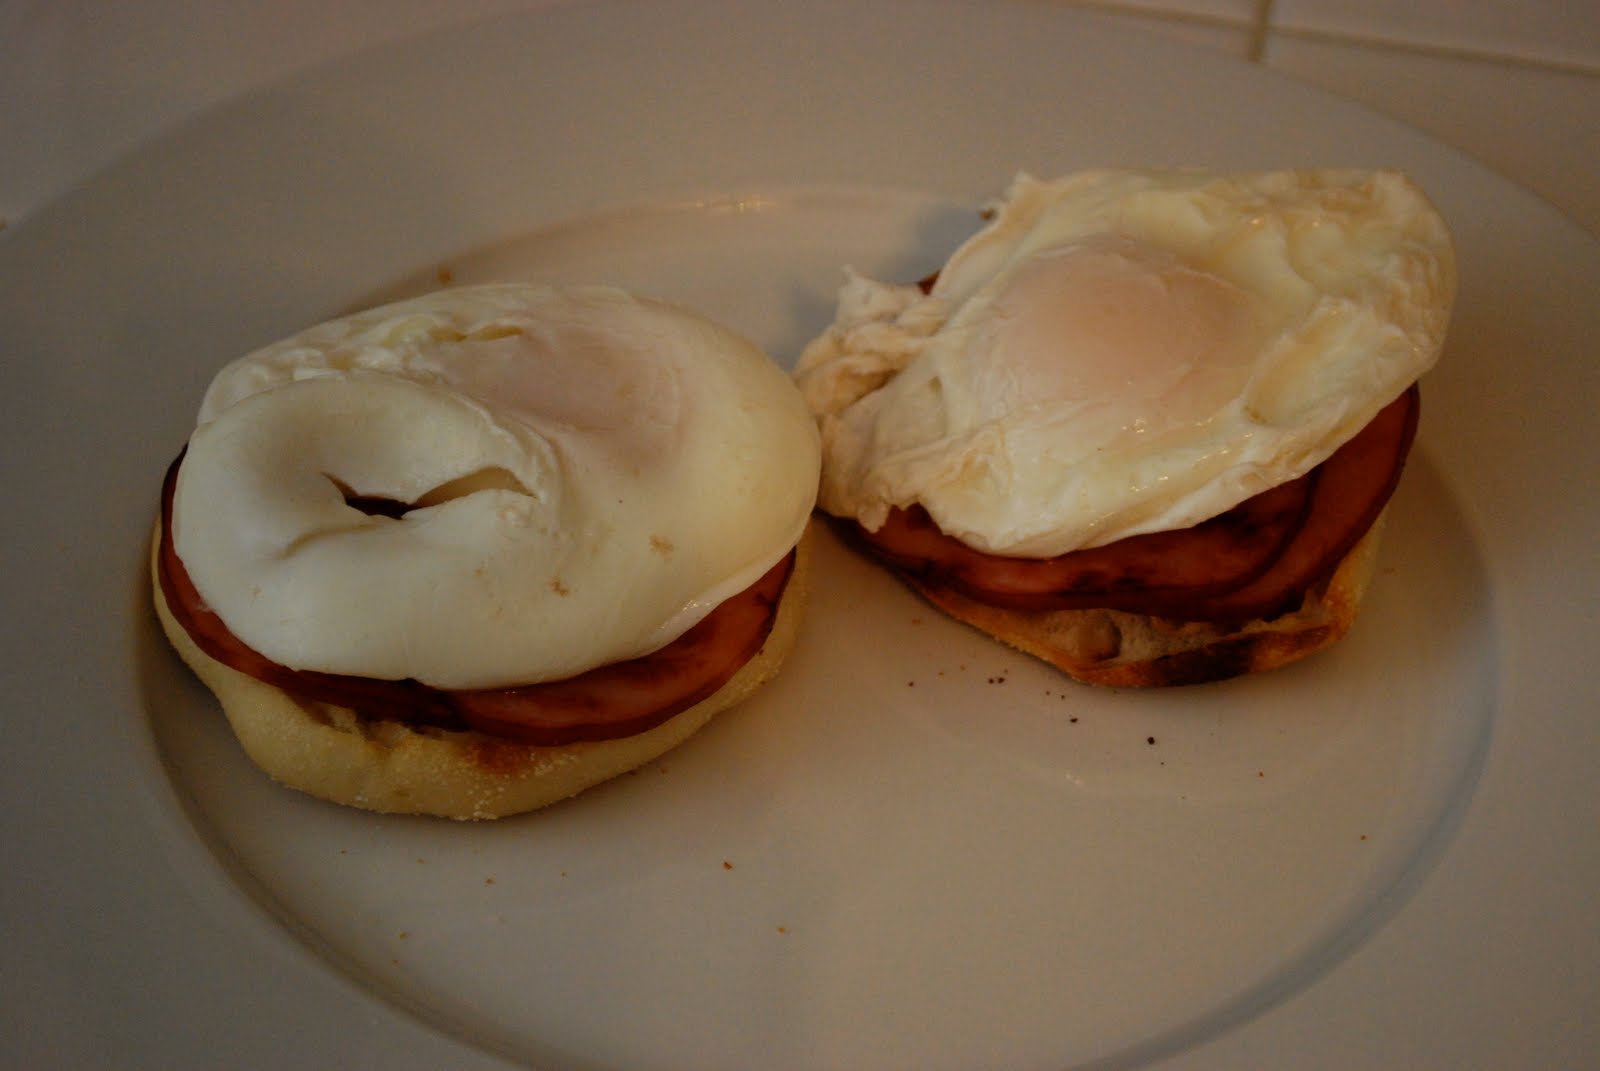
Eggs Benedict
For someone who doesn't usually eat breakfast, Ben is quite the morning cuisine expert. A couple of weeks ago he made these eggs Benedict and he was not surprised to hear that this would be my first time to try one. This is not unusual because I am known by many as the type of person who eats bread, chicken, and cheese. I was not forced to try new things as a child, something that Ben thinks is horrible, so now when I'm in my 20s I'm finally getting around to trying different foods.
 Ingredients
2 eggs
2 teaspoons white vinegar
4 egg yolks
1 teaspoon lemon juice
1/2 cup unsalted butter, melted
pinch cayenne
pinch salt
1 English muffin, halved
4 slices of Canadian Bacon
First we'll start with making the Hollandaise Sauce. Whisk egg yolks and lemon juice together in a stainless steel bowl until it has thickened and doubled in volume. Place the bowl over a sauce pan with barely simmering water (the water should not touch the bottom of the bowl). See picture below of Ben's "double-boiler. Continue to whisk rapidly, but be careful not to let the eggs get too hot or they will start to scramble. Slowly drizzle the melted butter and continue to whisk. Remove from heat and whisk in salt and cayenne.
 For the rest of the eggs Benedict - brown the Canadian bacon in a pan and set aside. Toast the halved English Muffin. In a non-stick skillet, add water half way up. Add white vinegar. Bring to a slow boil and carefully crack the eggs in the pan. Reduce heat to a simmer. Cook for 3 minutes until egg white is set. Remove from the pan with a large spoon and allow to drain. Assemble muffin, bacon, egg, and pour Hollandaise sauce over the top!
 Here's a picture of the eggs Benedict without the Hollandaise sauce so you can see the assembly a little better.

2 eggs
2 teaspoons white vinegar
4 egg yolks
1 teaspoon lemon juice
1/2 cup unsalted butter, melted
pinch cayenne
pinch salt
1 English muffin, halved
4 slices of Canadian Bacon
First we'll start with making the Hollandaise Sauce. Whisk egg yolks and lemon juice together in a stainless steel bowl until it has thickened and doubled in volume. Place the bowl over a sauce pan with barely simmering water (the water should not touch the bottom of the bowl). See picture below of Ben's "double-boiler. Continue to whisk rapidly, but be careful not to let the eggs get too hot or they will start to scramble. Slowly drizzle the melted butter and continue to whisk. Remove from heat and whisk in salt and cayenne.

Subscribe to:
Comments (Atom)