Wednesday, August 19, 2009

Party Aprons Galore!

A couple of weekends ago, I made entirely too many aprons, cut my pinkie finger on the sewing machine, and learned a lot about my sewing technique. You've seen some of these fabrics before, but some are new ones that I know I will be using again. I've started using only to two different fabrics, instead of three, replacing the third one with ruffles or lace.

I created a small information card to slip in the pocket and another to tie around the ties with Care Instructions.


Here's the dining room table/my sewing room with the six aprons laid out. Little did I know what I was getting myself into!


This apron is called Ocean Breeze, one of my new favorite fabric combination! The green lace at the pocket and bottom of the apron is vintage. My Mimi used to sew and luckily she saved just about everything and now I'm getting to use it!


This apron is called Mary's Garden, named after the main character in the Secret Garden. I have not used a lot of pinks in my fabrics (for no particular reason, because I like pink), but this is one I could never grow tired of.


This one is called Contemporary Vintage, because the apron fabric has a vintage-ish feel to it, but when mixed with the cute, small polka dots, it becomes something more modern!


This apron is called Sweet Plum. I was hesitant to buy this fabric at first, but I have found that it works well with so many others. The lace on this apron is from Mimi as well.


Can you tell I'm having fun? :)

Monday, August 17, 2009

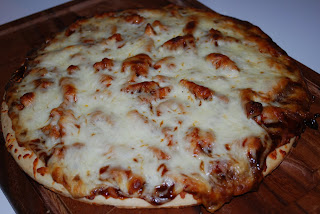
BBQ and Chicken Pesto Pizzas

For dinner a couple of weeks ago, I made two pizzas - one chicken pesto and one BBQ chicken. Both recipes are from Allrecipes.com which I have found to be full of great, easy ideas for dinner.


3 boneless chicken breast halves, cooked and cubed
1 cup hickory flavored BBQ sauce
3 tablespoons of honey (the recipe only calls for 1 tablespoon, but I love honey)
2 tablespoons molasses (the recipe only calls for 1 teaspoon, but what harm is a little more molasses going to do? none)
1/3 cup brown sugar
1/2 bunch fresh cilantro, chopped
1 (12 inch) pre-baked pizza crust
1 cup mozzarella (the recipe calls for smoked Gouda, both sounded good)
1 cup thinly sliced red onion (which I did not use, because I forgot to cut it)

Pre-heat oven to 425 degrees (I used 450 since that's what the pesto pizza calls for and it turned out fine). In a sauce pan over medium high heat, combine chicken, BBQ sauce, honey, molasses, brown sugar, and cilantro. Spread chicken mixture evenly over pizza crust and top with cheese and onions.


Here's the link to the chicken pesto pizza. This one was the easier of the two.


1/2 cup pesto basil sauce
1 (12 inch) pre-baked pizza crust
2 cups cooked chicken breast strips
1 (6 oz.) jar of artichoke hearts, drained
1/2 cup shredded mozzarella (I always use more than this because I like it cheesy)
1/2 cup feta cheese, crumbled

Pre-heat oven to 450 degrees. Spread pesto on the pizza crust. Arrange chicken pieces and artichoke hears over the sauce, and sprinkle with cheese. Bake until cheese is melted and the crust is lightly brown on the edges. So easy and so good!

I put the pizzas right on the grate in the oven so the crust gets crispier = more delicious.

Thursday, August 13, 2009

Coming soon...

I promise promise promise I have not forgotten about my blog. Life has been busy. I've been making lots of aprons (I got another order from the Winthrop Rockefeller Institute) and of course there's that pesky/mandatory thing called "work" that I have M-F (which in all honesty I love so I can't complain!). But I have some great recipes that I will add at the beginning of next week (I hope!).

In the meantime, Southern Living has some great one dish dinners. These are next on my list of things to try:
  • Spinach-Ravioli Lasagna
  • Peanut Broccoli Stir Fry (looks soooo good!)
  • Shrimp Casserole
  • Easy Enchiladas
  • Noodle Bowl

Wednesday, August 5, 2009

Kappa Delta Cookies

The Central Arkansas Kappa Delta Alumnae Chapter (CAKD) had a fajitas, 'ritas, and recs night last week and my contribution to the meal was "KD" sugar cookies. Fortunately, I had a KD cookie cutter to use, otherwise this would have been impossible.


My favorite sugar cookie recipe and the one I used this time is the below one.

Sugar Cookies Ingredients
  • 1/2 cup shortening
  • 1/2 cup butter, softened
  • 1 1/3 cups sugar
  • 3 teaspoons vanilla
  • 3 teaspoons almond
  • 2 eggs
  • 3 cups sifted flour
  • 1 teaspoon salt
  • 3/4 teaspoon baking powder
  • 2 tablespoons milk
Directions
1. cream shortening, butter, sugar, almond, and vanilla.
2. add eggs, beat well.
3. Sift flour, salt, and baking powder. Stir into creamed mixture along with milk.
4. chill overnight
5. roll onto floured board into 1/4" thickness and cut into desired shapes.
6. Place on greased cookie sheet and bake at 375 degrees for 4-6 minutes.

For these particular cookies, I only had to bake them for 4 minutes, because they were smaller.


The icing recipe I used is one that hardens as it dries. This is good for stacking cookies. To ice them, I used a 1" sponge brush and spread it on the cookies. This method is fast and easy and works well if you don't need to do a lot of detail on the cookies. The below recipe is a doubled one.

2 cup confectioner's sugar
4 teaspoons milk
4 teaspoons corn syrup
3 teaspoon vanilla flavoring
3 teaspoon almond flavoring


Stir sugar and milk together in a bowl until icing mixture is smooth; beat in corn syrup and vanilla and almond until icing mixture is smooth and glossy in appearance. Add food coloring to desired shade. Ice cookie and set aside for the icing to harden.

Wednesday, July 29, 2009

Fancy Camera Strap

I recently purchased a Nikon D60 (which I LOVE) and I had seen tutorials on how to cover an existing camera strap to make it more unique, so of course I needed to try making my own.


I searched around for a website that had good how-to instructions and this is the one I ended up using. She shows step-by-step instructions which makes this project relatively easy compared to other blogs I saw.

For this project, I used fusible interfacing for the first time. It's very easy to work with and definitely gives the camera strap more structure. I chose three different fabrics that had similar colors and cut different lengths of each. The hardest part was definitely turning the fabric right side out after I had sewn it together.


One thing I did different from the instructions was that I did not sew the fabric to the ends of the camera strap, because I was not sure if I would want to keep it on there forever. This way if I get tired of this fabric, I can slip it off and put a new one on! If you want to make a camera strap of your own, I suggest you go to the "Make It and Love It" blog, because she has some great advice, and because I got so excited about making mine, that I did not take ONE SINGLE PICTURE until it was finished. oops!

Tuesday, July 28, 2009

Not your ordinary jello shots


This weekend, Ben and I made jello shots. Yea yea, I know, we're not in college anymore, so what business do we have making jello shots, right? But these are "sophisticated" jello shots! I promise! Ben saw the idea on this website, which has some other tasty foods, as well.


To make the jello shots, you'll need 5 good-sized oranges. Cut them in half and scrape out the middle. Save the juice from the oranges, because you'll need it for the mixture. Now set the 10 orange halves into a casserole dish and start on the jello.

We used orange flavored jello, but I think it would look good with any orange-ish color jello, like tangerine or apricot. I got a large box of jello mix, rather than the small one. Add 2 cups of hot water to the mix, stir and let it cool a little bit before adding the vodka. We added about 1 1/2 cups (maybe less) of vodka to the jello mixture. Some of it was strawberry flavored left over from the strawberry lemon drops and then we use regular vodka, also pour in half a cup of orange juice. Mix well and pour into the orange halves. Fill them as close to the top as possible. Place in the refrigerator over night. Then slice and enjoy!


Thursday, July 23, 2009

Tasty Treats

I found these two pictures that I forgot to put up on the blog. This one is the strawberry lemon drops I made a couple of months ago. Here's the post with the recipe. These are sooooo good! In this picture, I added muddled strawberries to the mixture to make it red.


The next treat is a strawberry shortcake with whipped cream and mint leaves. I did not make the strawberries or the shortcake, but it's fun to make it look pretty!