Friday, January 29, 2010

Sugar Cookie Bars

I made some Razorback sugar cookies last weekend and had some leftover dough that I needed to use, so I decided that this ice/snow day we're getting in Arkansas would be the perfect opportunity to make some cookies.  I didn't want to go to all of the trouble of flouring the counter, rolling out the dough, cutting cookies, etc.  I wanted something easy and different.  So off to Google I went to find something to do with sugar cookie dough.  After a couple of minutes of searching, I came across My Baking Addiction.  She had made sugar cookies bars that looked too cute!  I knew I had found exactly what I was looking for.


With my cookie dough in one hand and a diet coke in the other I set off to try my hand at sugar cookie bars.

Cookie Ingredients:
1/2 cup shortening
1/2 cup butter, softened
1 1/3 cups sugar
3 teaspoons vanilla
3 teaspoons almond
2 eggs
3 cups sifted flour
1 teaspoon salt
3/4 teaspoon baking powder
2 tablespoons milk

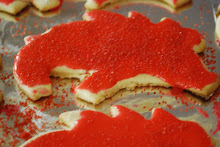
Cream shortening, butter, sugar, almond, and vanilla.  Add eggs, beat well. Sift flour, salt, and baking powder.  Stir into creamed mixture along with milk. Chill overnight.  Grease 2 13x9 casserole dishes and evenly spread dough out.  Bake on 375 degrees for 10 minutes.  Let cool on a wire rack and cut into desired shapes (I chose triangles).

Buttercream Icing Ingredients:
1 lbs powdered sugar (10x sifted)
1 tablespoon Wilton Meringue Powder
1 dash salt
1 cup white crisco
1 teaspoon Wilton no-color butter flavor
1 teaspoon clear vanilla extract
3-4 tablespoons water

Cream shortening, add butter flavor and vanilla and mix well. Add Meringue powder, sugar, and salt and gradually add water.

I transferred the icing to a bag and used a Wilton #12 tip to make the icing design.  Even though Valentine's Day (and Ben's birthday!) is over two weeks away, I still went with a Valentine's color scheme!


I'm thinking about bringing that snow back to my blog, since it's coming down pretty hard here!

Thursday, January 28, 2010

Notecards for a Good Cause!

I'm always looking for an excuse to buy cute notecards and I think handwritten notes are the best to send and receive (hint hint to all of my friends out there).  Thanks to my friends Tracy and Kerry, who introduced me to Design-her Gals, I have been able to design my very own personalized notecards.  This website is awesome (just look over to the right at my new addition on the blog side bar, isn't she cute!). 

Not only can you order notecards, notepads, return mailing labels, and invitations, but Design-her Gals also has a foundation called Gal to Gal which supports women with Stage IV breast cancer. 

I ordered my notecards last week and I cannot wait to get them in the mail!  They are very similar to the above picture (I had to include a cookie sheet, because I spend a lot of time with one!).

If you are in need of some cute, very personalized cards (or many other things) click on over to Design-her Gals and you will not be disappointed!

Tuesday, January 26, 2010

Snickers Pie!

Last night, I finally made the snickers pie (much to Ben's delight)!  And as Monograms and Manicures pointed out recently, National Pie Day was January 23 (so I think two days late is not that bad!).


See all of the yummy layers?

This pie is soooo good.  I had just a tiny nibble for breakfast (because I did not do a proper taste test last night).  It really makes a difference (in a good way) if you leave it in over night to chill.  The filling becomes even more to die for!

Ingredients
1 graham cracker pie crust (I used a pre-made because I was in a time crunch)
3 snickers bars
1 1/2 (8 oz) cream cheese packages
1/2 cup sugar
1/3 cup sour cream
2 eggs
2/3 cup semisweet chocolate morsels
2 tablespoons whipped cream
1/4 cup coarsely chopped, lightly salted peanuts

Preheat oven to 325. Cut snickers bars into 1/4 inch pieces and arrange in the bottom of the pie crust (see picture below).  Beat cream cheese and sugar at medium speed until well-blended.  Add peanut butter and sour cream and beat at low speed.  Add eggs one at a time and beat just until the yellow disappears each time.  Spoon mixture into the pie crust and bake for 35 minutes.  Remove and let cool on a wire rack for an hour.  Cover and chill for 2 hours.  Microwave semisweet morsels and whipped cream for 45 seconds, stirring every 15 seconds. Drizzle chocolate over the top of the pie and sprinkle with chopped peanuts.


Layer of sliced snickers bars in the bottom of the pie!


This pie takes patients (almost 4 hours of it!).  After you blend the peanut butter mixture, you're going to want to eat it with a spoon, and the only thing that stopped me from doing that was the fact that there were raw eggs in there (yuck).  Otherwise it could have been bad.  The layer of snickers in the bottom of the pie really adds that extra something to the pie and I'm willing to bet that it would taste just as good if it were in the bottom of cheesecakes, too!


This recipe is adapted from here.

Monday, January 25, 2010

Cheesy Chicken Enchiladas

We enjoyed these cheesy chicken enchiladas over the weekend.  The picture is not the best, but let's be honest, nothing really looks great in a casserole dish.


Ingredients:
2 tablespoon butter
1/2 cup chopped green onions
1 teaspoon garlic powder
8 oz. diced green chiles
2 cans of cream of chicken soup
3/4 cup sour cream
2 cups of chicken (we used rotisserie)
1 1/2 cup shredded cheddar cheese
1 package of large tortillas (10, I think)
1/2 cup of milk

  1. Preheat oven to 350 degrees F (175 degrees C). Lightly grease 2 large baking dishes.
  2. In a medium saucepan over medium heat, melt the butter and saute the green onion until tender (about 3 to 4 minutes). Add the garlic powder, then stir in the green chiles, cream of chicken soup and sour cream. Mix well. Reserve 3/4 of this sauce and set aside. To the remaining 1/4 of the sauce in the saucepan, add the chicken and 1/2 cup of shredded Cheddar cheese. Stir together.
  3. Fill each flour tortilla with the chicken mixture and roll up. Place seam side down in the prepared baking dish.
  4. In a small bowl combine the reserved 3/4 of the sauce with the milk. Spoon this mixture over the rolled tortillas and top with the remaining 1/2 cup of shredded Cheddar cheese. Bake in the preheated oven for 30 to 35 minutes, or until cheese is bubbly. 

recipe adapted from here.

Friday, January 22, 2010

Add Pizazz to your Cookie Bags!

In need of a little pizazz?  A little pick-me-up?  I wish I could claim these bag toppers as my own because they are so cute!  They add that little something extra to a plain ol'bag of cookies.


{http://www.livinglocurto.com/2009/05/thanks-printable/}

Over at Living Locurto she has a template you can print out for free!  And get this, they fit on any standard sized plastic baggie (7" wide).  I can't wait to make my next batch of cookies and use these toppers!

Happy Friday!

P.S. Thanks Polka Dot Birthday for sharing this great website! 

Monday, January 18, 2010

Caramel Covered Cheetos


I know what you're thinking..."what the heck? caramel covered Cheetos? are you out of your mind?"  No, I am not and luckily for you I am here to explain how to make this yummy treat!  I got the recipe from my friend Jennifer (and there's no doubt she's cool because we have the same name).

Warning: these are a crunchy, sweet snack that will disappear from your kitchen in a matter of hours!  Below are instructions for a half recipe.  This is what I made because I knew it would just be my family eating it and we don't need 4 pounds of cheetos staring us in the face!

Ingredients
1 bag of Cheetos (regular size)
1 stick of butter
1 cup brown sugar
1/4 cup corn syrup
1/4 teaspoon baking soda

Pre-heat oven to 250.  In a sauce pan, bring butter, brown sugar and corn syrup to a boil for 5 minutes.  Stir in baking soda.  Pour over Cheetos in a medium sized bowl.  Mix well and spread onto a baking sheet.  Place in the oven and bake for one hour, stirring every 15 minutes.  Quickly separate onto wax paper and let dry.


The pictures don't do them justice.  They had a nice candy coating and the cheese taste was surprisingly not too over-powering.
 

Wednesday, January 13, 2010

100th Post! Sushi!

My 100th post!  I can't believe it!  For this special post, I have a special meal - Sushi!  I have never tried to make sushi before and had always wanted to learn.  Luckily my sister, who's home from college, has recently learned how.  Last night we tried our hand at it and it turned out really well!


We set up three sushi making stations.  Our ingredients were avocado, crab, cucumber, cream cheese, shrimp, and carrots.  The good thing about sushi is that you can add whatever ingredients you want.


We were surprised to find that Wal-Mart had a nice selection of sushi making items, like the sticky rice and seaweed wraps.  The wooden spoons and bamboo mats were purchased at Whole Foods.

The recipe for how to make sticky rice is easy.  Combine 1 1/2 cups of Botan's Calrose rice and 2 cups of water.  Bring to a boil, then cover and simmer for 20 minutes.  Turn off heat and let the rice sit, still covered, for 10 additional minutes. DO NOT lift the lid or stir the rice.  While the rice is sitting, in a small sauce pan, combine 1/3 cup of vinegar, 2 tablespoons of sugar, and 1/2 teaspoon of salt.  Stir on medium heat until dissolved and remove from heat.  When the rice is finished, transfer it to a large bowl and with a wooden spoon, gradually stir in vinegar mixture.  Now the rice is ready to be made into sushi!

This website is a great tutorial for learning how to roll sushi.  Make sure you have a bowl of water close by, because you'll need to get your fingers wet to work with the sticky rice.


Layer the ingredients in the middle of the seaweed, making sure not to layer it too high.


After rolling the sushi, take a wet knife and slice the roll in half first, then slice each half in thirds.


Here is my sister's finished product!


Here's Ben's sushi roll.  So professional!


And just for fun, we made egg drop soup (yea yea, I know egg drop soup is Chinese and sushi is Japanese, so what?).


Ingredients
4 cups chicken broth
2 eggs, lightly beaten
salt and pepper to taste

Bring 4 cups chicken broth to boil.  Add salt and pepper. Slowly add the eggs to the broth in a steady stream.  To make shreds, stir the eggs rapidly clockwise for one minute.  To make ribbons, gently stir eggs clockwise.

Thanks for sticking around to read my 100th post!  I'm so happy to have made it to this day!

Sunday, January 10, 2010

Chocolate Chocolate Cake Bites

My dad actually found these delightful treats and suggested that I try them.  Well, six months later (because I'm just now getting around to it), here we are with chocolate chocolate cake bites.


Before I made my first batch, I did a little research about them and found this website.  Over at Bakerella she refers to them as cake balls and they are much fancier than these basic chocolate cake bites.

Ingredients:
chocolate cake mix (eggs, oil, etc)
1 can of cream cheese frosting
1 package of chocolate bark

Bake the cake as directed on the box.  Let it cool completely (I stuck mine in the garage where it's cold for 45 minutes).  Dump the cake and 3/4 can of cream cheese icing into a large bowl (or back into the baking dish as I did - see picture below).  Thoroughly mix the cake and icing.  Place in freezer for 30 minutes so cake can firm up.  Shape into balls.  Melt chocolate bark according to directions on the package (I had to add some milk to the chocolate to make it creamier).  Dip cake bites into chocolate (I used a spoon to carefully get them out).  Let dry on foil.  The recipe makes about 40 cake bites.


Now, don't get me wrong, you can mix and match and make any sort of cake bites you would like.  I just happen to love chocolate, so I chose to do these first.  You could also do yellow cake and red or green or whatever color bark simply by dyeing the white chocolate bark the color that you choose.

Thursday, January 7, 2010

Salmon with Roasted Broccoli and Seasoned Potatoes

Fancy cooking on a Wednesday night?  What has gotten into us, you say?  Nothing really.  Just wanted something different.  Don't be jealous.  You can do it, too!  Here are the recipes Ben and I used to make this yummy meal:


Balsamic-Glazed Salmon
6 (5oz). salmon fillets
4 cloves garlic, minced
1 tablespoon white wine
4 tablespoons honey
1/3 cup balsamic vinegar
4 tablespoon Dijon mustard
salt and pepper to taste

Pre-heat oven to 400 degrees.  Grease a broiling pan.  Arrange salmon on the pan and sprinkle salt and pepper on each fillet.  Set aside. Pour a little olive oil into a small sauce pan over medium heat. Cook garlic until soft, 3 minutes or so.  Add white wine, honey, vinegar, mustard, salt, and pepper.  Simmer 3 minutes or until slightly thickened.  Brush fillets with balsamic glaze.  Bake for 10-14 minutes.  Brush with remaining glaze before serving.  Recipe.

Oven Roasted Broccoli
1 pound broccoli, rinsed and trimmed
2 tablespoons olive oil
2 gloves of garlic, minced
1/2 teaspoon kosher salt
1/4 teaspoon freshly ground black pepper
1/3 cup panko bread crumbs
large handful of shredded cheddar

Pre-heat oven to 425. Cut broccoli into bite sized pieces. Cut stalk into slices.  In a mixing bowl, add broccoli, olive oil, garlic, salt and pepper.  Mix and set aside.  Spread bread crumbs on a 13x9 pan and place in oven for 5 minutes or until toasted.  Remove bread crumbs from oven and add them to the bowl with broccoli mixture.  Lightly toss.  Return mixture to pan and place in oven until broccoli is tender - 8-10 minutes. Remove from oven and toss with cheese.  Alton Brown's recipe.

Seasoned and Roasted Potatoes
7 medium gold potatoes
seasoned salt
onion powder
chopped garlic
olive oil

Clean and cut potatoes into cubes.  Add to 13x9 dish. Pour olive oil over potatoes.  Stir to make sure potatoes are well-coated.  Sprinkle seasoned salt, onion powder (somewhat generously).  Stir and sprinkle again.  Add chopped garlic and stir.  Place in oven on 350 degrees for 30-40 minutes.  Poke with a fork to make sure they are soft (but not too soft).  Remove from oven and serve.

Have questions?  Just ask!

Monday, January 4, 2010

Appetizers with Bacon

Recently, I have noticed an abundance of appetizer recipes using bacon.  (I can already hear all of the "yummms" out there)  I have not always been the biggest fan of bacon.  In fact, for a couple of years I refused to eat it (this is because of a certain movie I watched in French class circa 1999).  But I have overcome my disgust/fear of bacon and fully embraced it as a delicious accompaniment to many recipes. Therefore, I bring you the three best appetizer recipes (according to me) that use bacon:


Bacon-Wrapped Crackers
These delightful treats take a little bit of time to prepare and bake, but are well worth it.


Ingredients:
Club Crackers
Sliced Parmesan Cheese
Thinly Sliced Bacon

Directions:
Pre-heat oven to 250 degrees. Cut bacon into thirds.  (I always have to stretch the bacon out a little so that it will wrap around the cracker.  I tried cutting it in half, but it turned out to be too much bacon on one little club cracker.)  Place a couple of pieces of Parmesan cheese on each cracker and carefully wrap the bacon around the crackers.  Place on a baking sheet and bake for 60-70 minutes.


Bacon-Wrapped Dates with Fontina Cheese
These are the perfect combination of sweet and salty, with a little bit of cheese.


Ingredients:
Package of Dates
Small Block of Fontina Cheese
Thinly Sliced Bacon

Directions:
Pre-Heat oven to 250 degrees. Carefully slice the dates open, making sure not to cut it completely into two pieces.  Place a small piece of cheese in the middle of the date.  Cut bacon into thirds and wrap a slice around each date.  Bake for 40-50 minutes depending on your oven.

Cheesy Bacon Dip
I bet you're noticing a theme with these dishes (cheese + bacon = yummy!)


Ingredients:
1/2 low fat mayo (see, I'm trying to be good)
8 oz. of low fat cream cheese
2 finely chopped scallions
2 cups shredded cheddar cheese (ok, the "being good" didn't last long)
6 Ritz crackers
1/2 cup of Captain Rodney's Boucan Glaze (found online here or at many gourmet food stores)
8 strips of bacon, cooked and crumbled

Directions:
Pre-heat oven to 350 degrees. Mix mayo, cream cheese, scallions, and shredded cheddar and spread in the bottom of a small casserole dish. Top with crushed Ritz crackers.  Bake for 20 minutes.  Remove from oven and top with glaze and bacon.  Serve with Ritz crackers.

My friend, Katie, made the bacon-wrapped dates the first time I tried them and made the cheesy bacon dip this past weekend.  She sure knows how to find delicious recipes!